KerasでDAE(Denoising AE)を試してみた【備忘録】
はじめに
こんにちは、がんがんです。前回はAutoEncoderについて改めて実験し、備忘録をまとめました。
前回の記事はこちらです。
gangannikki.hatenadiary.jp
今回は前回の続きからDAEについて実験していきます。
追記【2019.04.29】
GitHubのリンクを追加しました。
今回のコード
参考記事
今回もKerasチームのブログを参考にしていきます。
Building Autoencoders in Keras
Jupyter Notebookで書かれているこちらも参考になりました。
qiita.com
また、KerasでAutoEncoderについて解説されている記事も参考になります。
elix-tech.github.io
DAE(Denoising AE)
DAE(Denoising AE)とはAutoEncoderを用いてノイズ除去を行うモデルです。
理論については参考記事で詳しく書かれているのでそちらを参考にしてください。
今回はMNISTとCifer10の2つのデータで試してみました。
MNISTによる実験
まずはデータのインポート・ノイズ付与を行います。
#  データのロード・分割
(x_train, y_train), (x_test, y_test) = mnist.load_data()	#  (60000, 28, 28), (10000, 28, 28)
x_train = x_train.astype('float32') / 255.
x_test = x_test.astype('float32') / 255.
x_train = np.reshape( x_train, (len(x_train), 28, 28, 1) )	#  (使用数,チャネル数,x,y)=(60000, 1, 28, 28)
x_test = np.reshape( x_test, (len(x_test), 28, 28, 1) )

"""
	ノイズの付与
"""
noise_factor = 0.5

#  平均0、標準偏差1の正規分布
x_train_noisy = x_train + noise_factor * np.random.normal( loc=0., scale=1., size=x_train.shape )
x_test_noisy = x_test + noise_factor * np.random.normal( loc=0., scale=1., size=x_test.shape )

x_train_noisy = np.clip( x_train_noisy, 0., 1. )
x_test_noisy = np.clip( x_test_noisy, 0., 1. )
次にモデル関数です。MNISTは短くても大丈夫なので、epoch=10で試しています。
"""
	モデルの生成、学習
"""
def model( x_train_noisy, x_train, x_test_noisy, x_test ):
        #  28×28、グレースケール
	input_img = Input( shape=( 28, 28, 1) )

	#  Encode_Conv1
	x = Conv2D( 32, (3, 3), padding='same', activation='relu' )(input_img)
	x = MaxPooling2D( ( 2, 2), padding='same' )(x)
	#  Encode_Conv2
	x = Conv2D( 32, (3, 3), padding='same', activation='relu' )(x)
	encoded = MaxPooling2D( ( 2, 2), padding='same' )(x)

	#  Decode_Conv1
	x = Conv2D( 32, (3, 3), padding='same', activation='relu' )(encoded)
	x = UpSampling2D(( 2, 2))(x)
	#  Decode_Conv2
	x = Conv2D( 32, (3, 3), padding='same', activation='relu' )(x)
	x = UpSampling2D(( 2, 2))(x)
	decoded = Conv2D( 1, (3, 3), padding='same', activation='sigmoid' )(x)

	autoencoder = Model( input_img, decoded )
	autoencoder.compile( optimizer='adam',
			     loss='binary_crossentropy',
			     metrics=["accuracy"] )

	#  アーキテクチャの可視化
	autoencoder.summary()	#  ディスプレイ上に表示
	plot_model( autoencoder, to_file="architecture.png")

	#	モデルの学習
	epochs = 10
	batch_size = 128
	tensor_board = TensorBoard( "./logs", histogram_freq=0, write_graph=True, write_images=True )

	history = autoencoder.fit( x_train_noisy, x_train,
			           epochs=epochs,
			           batch_size=batch_size,
			           shuffle=True,
			           validation_data=(x_test_noisy,x_test),
			           callbacks=[ tensor_board ] )

	#  学習のグラフ化
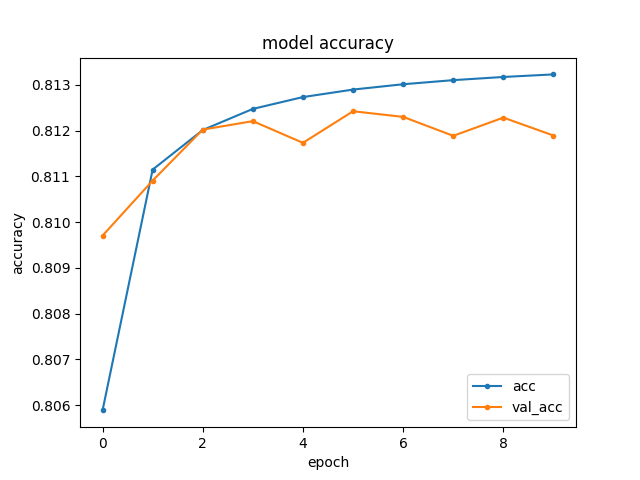
	plot_history( history, epochs )
結果
最終的な結果は以下のとおりです。


Cifer10による実験
次に、Cifer10のデータでノイズ除去を試してみます。まずはデータのインポート・ノイズ付与を行います。
#	Cifer10のLoad, データの分割
num_classes = 10
(x_train, y_train), (x_test, y_test) = cifar10.load_data()	#  学習:50000, テスト:10000
x_train = x_train.astype('float32')
x_test = x_test.astype('float32')
x_train /= 255
x_test /= 255

"""
	ノイズの付与
"""
noise_factor = 0.1

#  平均0、標準偏差1の正規分布
x_train_noisy = x_train + noise_factor * np.random.normal( loc=0., scale=1., size=x_train.shape )
x_test_noisy = x_test + noise_factor * np.random.normal( loc=0., scale=1., size=x_test.shape )

x_train_noisy = np.clip( x_train_noisy, 0., 1. )
x_test_noisy = np.clip( x_test_noisy, 0., 1. )
次はモデルについてです。Cifer10はカラーなのでchannel数は3になっています。
def model( x_train_noisy, x_train, x_test_noisy, x_test ):
	input_img = Input( shape=( 32, 32, 3) )	#  32×32、RGB

	#  Encode_Conv1
	x = Conv2D( 32, (3, 3), padding='same' )(input_img)
	X = BatchNormalization()(x)
	x = Activation('relu')(x)
	x = MaxPooling2D( (2, 2), padding='same' )(x)
	#  Encode_Conv2
	x = Conv2D( 32, (3, 3), padding='same' )(x)
	X = BatchNormalization()(x)
	x = Activation('relu')(x)
	encoded = MaxPooling2D( (2, 2), padding='same' )(x)

	#  Decode_Conv1
	x = Conv2D( 32, (3, 3), padding='same' )(encoded)
	X = BatchNormalization()(x)
	x = Activation('relu')(x)
	x = UpSampling2D((2, 2))(x)
	#  Decode_Conv2
	x = Conv2D( 32, (3, 3), padding='same' )(x)
	X = BatchNormalization()(x)
	x = Activation('relu')(x)
	x = UpSampling2D((2, 2))(x)
	#  Decode_Conv3
	x = Conv2D( 3, (3, 3), padding='same' )(x)
	X = BatchNormalization()(x)
	decoded = Activation('sigmoid')(x)

	#  conpile
	autoencoder = Model( input_img, decoded )
	autoencoder.compile( optimizer='adam',
	                     loss='binary_crossentropy',
	                     metrics=["accuracy"] )

	#  アーキテクチャの可視化
	autoencoder.summary()	#  ディスプレイ上に表示
	plot_model( autoencoder, to_file="architecture.png" )

	epochs = 200
	batch_size = 128

	tensor_board = TensorBoard( "./logs", histogram_freq=0, write_graph=True, write_images=True )

	history = autoencoder.fit( x_train_noisy, x_train,
				   epochs=epochs,
			           batch_size=batch_size,
				   shuffle=True,
				   validation_data=(x_test_noisy,x_test),
			           callbacks=[ tensor_board ] )
結果は以下のとおりです。ちゃんとノイズが消えていますね。
まとめ
今回はノイズ除去モデルであるDenoising AEについて備忘録を書きました。
前期はノイズ除去系を結構やっていたので、後期が終了するまでには頑張ってまとめていきます。